TimeVue – Delete Employees and Completely Remove them from the Database
KB0065: TimeVue – Delete Employees and Completely Remove them from the Database
Solution:
To delete an employee from TimeVue and from the database, you must follow the specific procedure outlined below.
Save an Archive of Your Data
- Before making any changes, save an archive of your data. The archive will be used, if you ever want to view the employee’s past time cards.
- From the TimeVue Switchboard, select Archive.
- Be sure not to overwrite a previous archive by changing the name of the archive you are creating. We suggest saving the archive with the current date.
- When prompted to delete old data from the database, select No.
Set the Employee to Be Deleted and Remove the Employee from the Time Clock
- From the TimeVue Switchboard, go to the Employee screen.
- Select the employee you want to delete.
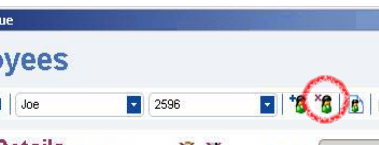
- Select the Delete Employee icon. The employee status will change to Delete Pending.

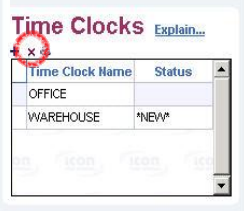
- Remove the employee from all assigned time clocks by selecting the time clock name, then click the X beneath Time Clocks, to remove the clock.
-

- If you are deleting more than one employee, follow these steps for each employee to be deleted.
- Close the Employee screen and go to Punches.
Delete All Punches Associated with the Deleted Employee
- Select the employee that is being deleted.
- In the Show Punches from field, select All Pay Periods.
- Delete all punches in the system for this employee.
- Select the punch row, click the red X to delete the punch pair.
- Make sure all punches are deleted for the employee.
- If you are deleting more than one employee, delete all punches for each employee to be deleted.
- Close the Punches screen.
Poll the Time Clock(s)
- From the TimeVue Switchboard, select Poll Time Clock, then Poll All Clocks.
- After seeing the message Polling Successful, click OK.
- Select Quit.
Archive Your Data Again and Remove Data
- Before making any changes, save an archive of your data. The archive will be used, if you ever want to view the employee’s past time cards.
- From the TimeVue Switchboard, select Archive.
- Be sure not to overwrite a previous archive by changing the name of the archive you are creating. We suggest saving the archive with the current date and a number 2.
- When prompted to delete old data from the database, select Yes.
- All punches prior to the date listed under Remove Old Data will be deleted from the database.
- Change the date to a date in the past so current punches are not deleted (example: 01/01/2012)
- Select OK.
- IMPORTANT!!! Deleting old data from the database is part of the deleting employee process and cannot be skipped.
- The employee or employees should now be deleted from the database. Their clock id numbers can now be assigned to another employee.
Additional Steps for HandPunch Biometric Clocks – Remove Employees from the Time Clock
- At the HandPunch clock, press Clear and Enter to enter Supervisor Mode.
- Enter your Supervisor Code and place your hand.
- Select password 4 and press Enter.
- Press NO until the option Remove User appears. Select YES.
- Enter the ID number of the user/employee to remove and press Enter.
- Repeat this step for all users/employees you want to remove
<!–
Another, but not recommended, solution to this issue is to add negative non-worked hours to the punches screen. In Punches screen you can use Individual Add Hours to deduct hours. For example, create a code called LNC, specify a date, and enter a negative number in the HOURS field. This will create a unique row for that date in the punches screen and in the employee report and subtract the desired amount of time from the employees total hours
–>